|
How to Setup a POP3 Email Account
in the Microsoft Outlook Express Email Client
If you decide that you do not like using webmail to access your emails, you can setup your email account using a different email client.
The definition of an email client is any software program that allows users to send and receive email messages and file attachments.
I've created this quick and easy tutorial that will help you setup your email account in an email client (Microsoft Outlook Express). I'm using this client, specifically, because it is a very common email client that is often used by businesses and provides some very useful email management tools. It, also, comes with Microsoft Office products so is widely available. In fact, you may already have it on your computer ... even if you don't realize it. However, if you don't already have it, you can download it from Microsoft's Official Download Center.
Once you have installed Microsoft Outlook Express, you can start the following steps to setup your email account:
- Open up your Microsoft Outlook Express Email Client.
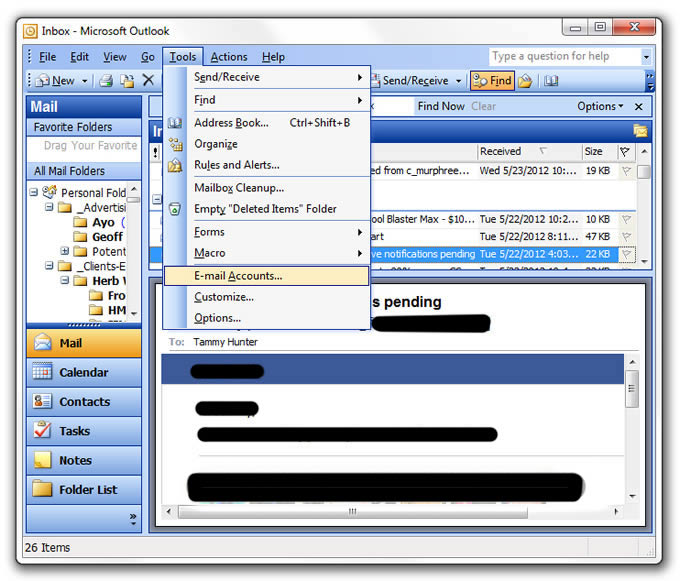
- Click on 'Tools' and then click on 'Email Accounts'. See illustration below.
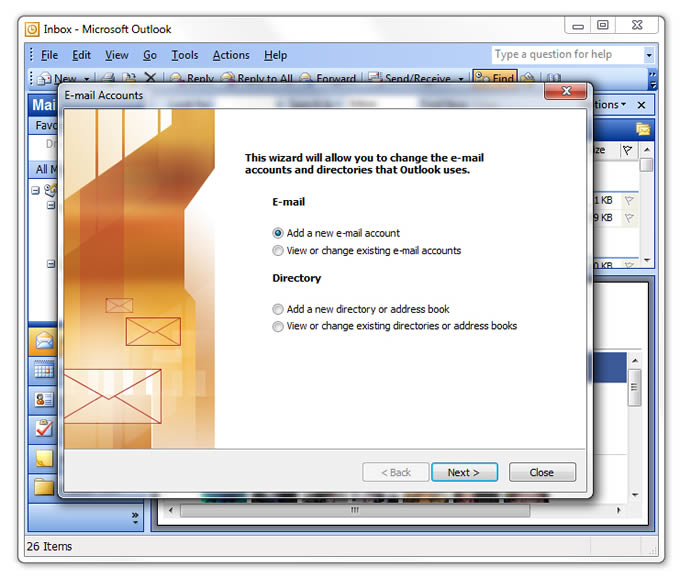
- Choose 'Add a new e-mail account' by checking the button and clicking on 'Next'. See illustration below.
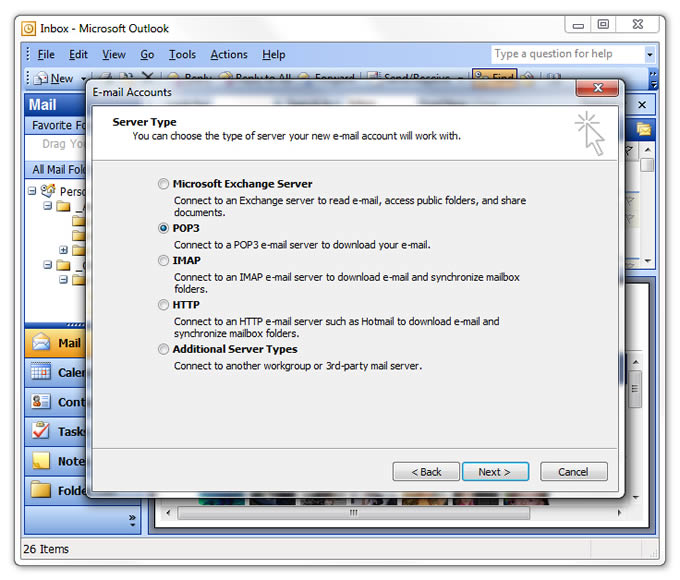
- Now, Click on 'POP3' and click on 'Next'. See illustration below.
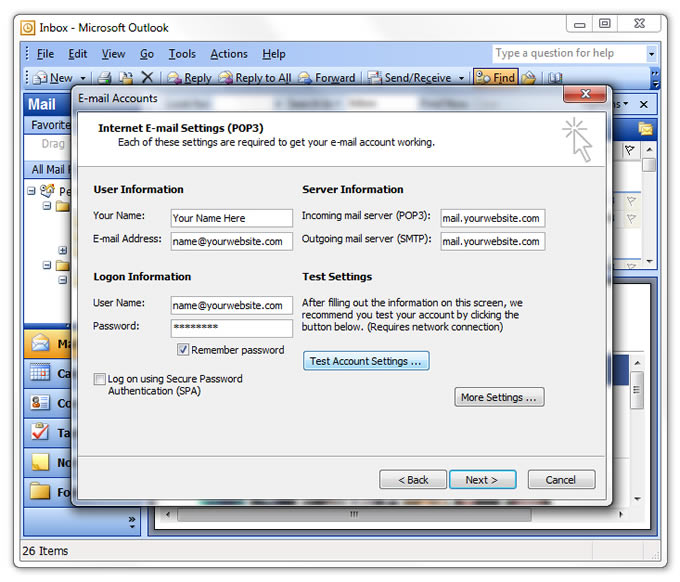
- Enter your User Information with your name and your full email address. See illustration below.
Enter your Login Information:
UserName - enter your FULL email address (ex: name@yourwebsite.com)
Password - enter your
password EXACTLY as it is (with capitals and lowercase)
Click the box for 'Remember Password' or you will have to enter it each time.
DO NOT click the box for Secure Password Authentication (SPA).
Enter your Server Information:
Incoming Mail Server (POP3) - enter it as: mail.yourwebsite.com
Outgoing Mail Server (SMTP) - enter it the same way ... as: mail.yourwebsite.com
Outgoing Mail Server requires authentication.
(Please note that you will change 'yourwebsite.com' with your actual website
domain)
Then, click 'Test Account Settings'
to see if you have successfully set up your email account. It will say Outlook is testing the account settings you entered. If it worked, click 'Next' and it will tell you 'Congratulations!' You have successfully entered all the information required to setup your account.
IMPORTANT NOTE: If you want
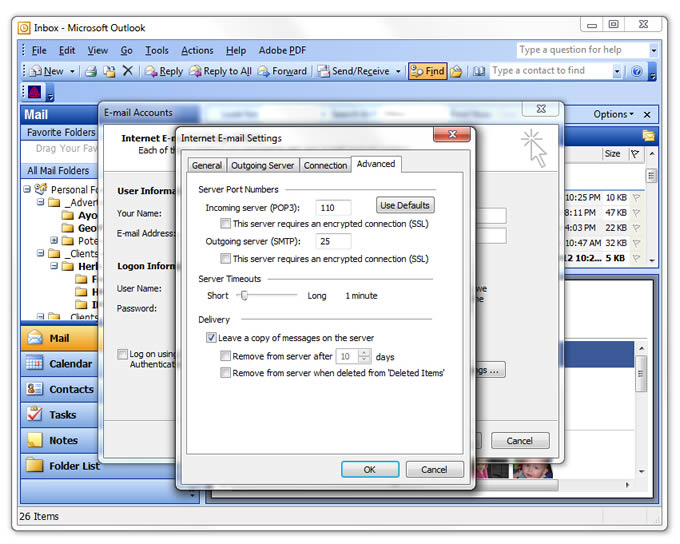
to be able to access your emails from more than one computer, you will need to click 'More Settings' to see if you need to change your settings. See illustration below.
After clicking 'More Settings', go to the 'Advanced' tab and check 'Leave a copy of messages on the server' otherwise it will delete them and your emails will be deleted after being downloaded to your computer. You can choose to check either of the two boxes below that, if you want. If you don't check them, all of the emails will remain on your server permanently ... including spam ... and you could eventually run out of space which would make your email account shut down until you delete some of it to make more space. I would, personally, recommend checking the bottom box 'Remove from server when deleted from Deleted Items'.
Troubleshoot - If you have problems and cannot get your email to work successfully, make sure you have entered everything correctly EXACTLY as required. If it still does not work please note the following:
Sometimes the Username/Account name must be the FULL email address (ex: name@yourwebsite.com).
Sometimes it won't work until you replace the '@' with a '+' in the username.
Incoming Mail Port should be: 110 for POP3 (143 for IMAP)
Outging Mail Port should be: 25 (if 25 doesn't work, contact your internet service provider for the correct port #)
NO SSL boxes should be checked.
If you have an iPad and your email was already set up incorrectly, you won't be able to just update the settings. You will need to fully delete the account from your iPad and perform a hard reset before trying to set up the account with the correct settings again.
Once your settings are all correct, then, you can click 'Finish'.
- If you had errors while setting up your email account, go back and follow each of the steps. It is usually a typo that is keeping your account from being set up.
- If you have gone through step #6 and are still having issues, you will need to contact your internet service provider to see if they can help you troubleshoot. Once you get to this point, and you are positive that you have entered the settings correctly (without any typos and all caps and lowercase as specified), the problem is usually with an internet service provider's setting that needs to be changed. Often times, this is usually just a port number that needs changed because they do not use certain settings to help avoid spam but you will not know this unless you speak with your provider.
|